System Administration

Password Recovery in Redhat 7

Forgot your password on your rhel7 server? Well there are some differences to process from rhel6. Here is how you do it.

With SELinux and systemd in the mix we have to deal with that. Here is the procedure of what needs to be done in order to recover a forgotten root password on Redhat 7 Linux:

Edit the GRUB2 boot menu and enter user single mode
Remount / partition to allow read and write
Reset the actual root password
Set entire system for SElinux relabeling after first reboot
Reboot the system from single mode

Now that we understand the procedure we can proceed with Redhat 7 password recovery.

1. Edit GRUB2 boot menu

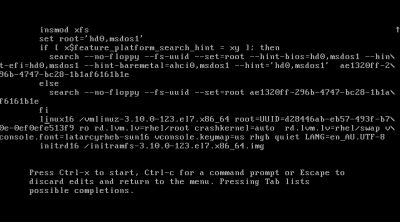
Start your system and once you see your GRUB2 boot menu use ‘e’ key to edit your default boot item. Usually it is the first line. Once you hit the ‘e’ key, scroll down and locate a line with ‘rhgb quiet’ keywords:

locate-line-grub2-boot-menu-rhel7-linuxMove to end of the line with CTRL+E then cursor to “rhgb quiet" keywords and replace them with “init=/bin/bash" as show below:
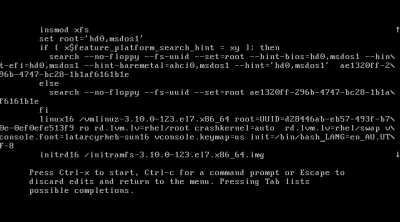
grub2-boot-menu-rhel7-linux-single-mode-reset-password

Once you edit the boot line as show above press “CTRL + x" to start booting your RHEL 7 system into a single mode. At the end of the system boot you will enter a single mode.


2. Read&Write root partition remount

Once you enter a single your root partition is mounted as Read Only ro. You ca confirm it with the following command:

# mount | grep root

In order to mount our partition with Read/Write flag we use mount with a remount option as follows:

# mount -o remount,rw /

Next, confirm that the root file system is mounted Read/Write rw:

# mount | grep root

3. Change root’s password

Still in the single mode we can proceed with the actual root password recovery. To do this we use passwd command:

# passwd

You will need to enter your password twice.

4. SELinux relabeling

The additional step which needs to be taken on SELinux enables Linux system is to relabel SELinux context. If this step is ommited you will not be able to login with your new root password. The following command will ensure that the SELinux context for entire system is relabeled after reboot:

# touch /.autorelabel

5. Reboot System

The final step when resetting your lost root password on RHEL 7 linux system is to reboot. This can be done with a following command:

# exec /sbin/init

After reboot you will be able to use your new root password.

When did that change?

Trying to shutdown an old web server from the late 1990’s that had it’s guts transplanted onto a newer system around 2003 and again around 2009. As you can imagine there are accounts and files that are like those items in your junk drawer, they beg the question…why is this here?!

In an attempt to determine last use of accounts we combined some log analysis with some unix timestamp forensics to prove that no one really needs this anymore!

The log analysis was pretty easy, track non-robot traffic to determine which accounts were being accessed and at what frequency and volume. The timestamp wasn’t difficult just had to isolate which files we wanted to analyze. Using the `stat`, `find` and/or the `ls` commands make this easy. In case you are not aware of this Linux/Unix stores a number of timestamps for each file.  These timestamps store when any file or directory was last accessed (read from or written to),  changed (file access permissions were changed) or modified (written to).

Three times tracked for each file in Linux/Unix are:

  • access time – atime
  • change time – ctime
  • modify time – mtime

Aside from using atime, ctime or mtime, the easiest way to get the information we are looking for is using the `stat` command:

# stat /home/myhome/file1 
  File: `/home/myhome/file1'
  Size: 1498906   	Blocks: 2928       IO Block: 4096   regular file
Device: fd01h/64769d	Inode: 3414009     Links: 1
Access: (0664/-rw-rw-r--)  Uid: (  500/   myhome)   Gid: (  500/   users)
Access: 2016-01-26 12:53:01.309089993 -0500
Modify: 2013-07-15 10:28:05.241847000 -0400
Change: 2013-07-15 10:28:05.315848001 -0400

If you are looking for a large set of files that have been accessed/modified/changed before or after a specific date then using the `find` command is your best bet.

For single files or a small set of files the `ls` command is probably easier.

For information on how to use atime, ctime and mtime with `find` and `ls` refer to the man page for the specific command.

Subnet Mask Cheat Sheet

Here is a “Subnet Mask Cheat Sheet” since I don’t have to remember this that often any more.

Information found also via RFC 1878.


Addresses Hosts Netmask Amount of a Class C
/30 4 2 255.255.255.252 1/64
/29 8 6 255.255.255.248 1/32
/28 16 14 255.255.255.240 1/16
/27 32 30 255.255.255.224 1/8
/26 64 62 255.255.255.192 1/4
/25 128 126 255.255.255.128 1/2
/24 256 254 255.255.255.0 1
/23 512 510 255.255.254.0 2
/22 1024 1022 255.255.252.0 4
/21 2048 2046 255.255.248.0 8
/20 4096 4094 255.255.240.0 16
/19 8192 8190 255.255.224.0 32
/18 16384 16382 255.255.192.0 64
/17 32768 32766 255.255.128.0 128
/16 65536 65534 255.255.0.0 256


Rhel6, Rhel7 Comparison

Moving from Redhat 6 to Redhat 7.  There are a *lot* of differences to get use to.  It is like having a friend come over and rearrange your entire house, including all the closets and cupboards!! You know it is your house, you just can’t seem to find any of your stuff!

Features RHEL 7 RHEL 6
Default File System XFS EXT4
Kernel Version 3.10.x-x kernel 2.6.x-x Kernel
Kernel Code Name Maipo Santiago
General Availability Date of First Major Release 2014-06-09 (Kernel Version 3.10.0-123) 2010-11-09 (Kernel Version 2.6.32-71)
First Process systemd (process ID 1) init (process ID 1)
Runlevel runlevels are called as “targets” as shown below:runlevel0.target -> poweroff.target

runlevel1.target -> rescue.target

runlevel2.target -> multi-user.target

runlevel3.target -> multi-user.target

runlevel4.target -> multi-user.target

runlevel5.target -> graphical.target

runlevel6.target -> reboot.target

/etc/systemd/system/default.target (this by default is linked to the multi-user target)

Traditional runlevels defined :runlevel 0

runlevel 1

runlevel 2

runlevel 3

runlevel 4

runlevel 5

runlevel 6

and the default runlevel would be defined in /etc/inittab file.

/etc/inittab

Host Name Change with the move to systemd, the hostname variable is defined in /etc/hostname. In Red Hat Enterprise Linux 6, the hostname variable was defined in the /etc/sysconfig/network configuration file.
Change In UID Allocation By default any new users created would get UIDs assigned starting from 1000.This could be changed in /etc/login.defs if required. Default UID assigned to users would start from 500.
This could be changed in /etc/login.defs if required.
Max Supported File Size Maximum (individual) file size = 500TBMaximum filesystem size = 500TB(This maximum file size is only on 64-bit machines. Red Hat Enterprise Linux does not support XFS on 32-bit machines.) Maximum (individual) file size = 16TBMaximum filesystem size = 16TB(This maximum file size is based on a 64-bit machine. On a 32-bit machine, the maximum files size is 8TB.)
File System Check “xfs_repair”XFS does not run a file system check at boot time. “e2fsck”File system check would gets executed at boot time.
Differences Between xfs_repair & e2fsck “xfs_repair”- Inode and inode blockmap (addressing) checks.- Inode allocation map checks.

– Inode size checks.

– Directory checks.

– Pathname checks.

– Link count checks.

– Freemap checks.

– Super block checks.

“e2fsck”- Inode, block, and size checks.- Directory structure checks.

– Directory connectivity checks.

– Reference count checks.

– Group summary info checks.

Difference Between xfs_growfs & resize2fs “xfs_growfs”xfs_growfs takes mount point as arguments. “resize2fs”resize2fs takes logical volume name as arguments.
Change In File System Structure /bin, /sbin, /lib, and /lib64 are now nested under /usr. /bin, /sbin, /lib, and /lib64 are usually under /
Boot Loader GRUB 2Supports GPT, additional firmware types, including BIOS, EFI and OpenFirmwar. Ability to boot on various file systems (xfs, ext4, ntfs, hfs+, raid, etc) GRUB 0.97
KDUMP Supports kdump on large memory based systems up to 3 TB Kdump doesn’t work properly with large RAM based systems.
System & Service Manager “Systemd”systemd is compatible with the SysV and Linux Standard Base init scripts it replaces. Upstart
Enable/Start Service the systemctl command replaces service and chkconfig.- Start Service : “systemctl start nfs-server.service”.

– Enable Service : To enable the service (example: nfs service ) to start automatically on boot : “systemctl enable nfs-server.service”.

Although one can still use the service and chkconfig commands to start/stop and enable/disable services, respectively, they

are not 100% compatible with the RHEL 7 systemctl command (according to redhat).

Using “service” command and “chkconfig” commands.- Start Service : “service start nfs” OR “/etc/init.d/nfs start”

– Enable Service : To start with specific runlevel : “chkconfig –level 3 5 nfs on”

Default Firewall “Firewalld (Dynamic Firewall)”The built-in configuration is located under the /usr/lib/firewalld directory. The configuration that you can customize is under the /etc/firewalld directory. It is not possible to use Firewalld and Iptables at the same time. But it is still possible to disable Firewalld and use Iptables as before. Iptables
Network Bonding “Team Driver”-/etc/sysconfig/network-scripts/ifcfg-team0

– DEVICE=”team0”

– DEVICETYPE=”Team”

“Bonding”-/etc/sysconfig/network-scripts/ifcfg-bond0

– DEVICE=”bond0”

Network Time Synchronization Using Chrony suite (faster time sync compared with ntpd) Using ntpd
NFS NFS4.1NFSv2 is no longer supported. Red Hat Enterprise Linux 7 supports NFSv3, NFSv4.0, and NVSv4.1 clients. NFS4
Cluster Resource Manager Pacemaker Rgmanager
Load Balancer Technology Keepalived and HAProxy Piranha
Desktop/GUI Interface GNOME3 and KDE 4.10 GNOME2
Default Database MariaDB is the default implementation of MySQL MySQL
Managing Temporary Files systemd-tmpfiles (more structured, and configurable, method to manage tmp files and directories). Using “tmpwatch”
References :-

Disk Woes

I hope to never use this document again but thought it worth documenting in case someone else has need of the information.  I powered my desktop off for a planned power outage.  When I powered it back on the system failed to boot reporting either “Error 17” or “Error 25”, in short the software raid (mirrored disks) were corrupted…  The timing of this event could not have been better.  The power outage included our data center, so I had to power over 100 systems on without my desktop!  Thank God for Live CDs!!  Following the power on there were other issues to deal with so it was almost a week before I could deal with my failed desktop.  Here is what I tried:

“sata to USB cable” since the drive was part of a raid pair this didn’t work and I didn’t waste a lot of time on it.  What it did help me discover was which disk was bad.

Knowing which disk was bad I then confirmed the failed drive using the BIOS and boot sequence on my desktop.  I confirmed it was /dev/sda that was failed.  I was able to get a replacement disk on the same size from our desktop support team.  With the new disk installed here is what I did and the results.

Boot the system to an Ubuntu Live CD

I don’t have time to add much description now but the commands and sequence should hopefully help for now.  Feel free to post a question in the comments if you have any.

sudo mdadm --query --detail /dev/md/1
sudo mdadm --assemble --scan
sudo mdadm --query --detail /dev/md/1
sudo mdadm --assemble 
sudo mdadm --assemble --scan

sudo mdadm --query --detail /dev/md/1
sudo mdadm --query --detail /dev/md/0
sudo mdadm --query --detail /dev/md/2
sudo mdadm --query --detail /dev/md/3

sudo mdadm --stop /dev/md/0
sudo mdadm --stop /dev/md/1
sudo mdadm --stop /dev/md/2
sudo mdadm --stop /dev/md/3

sudo mdadm --query --detail /dev/md/0
sudo mdadm --query --detail /dev/md/1
sudo mdadm --query --detail /dev/md/2
sudo mdadm --stop /dev/md/2
sudo mdadm --query --detail /dev/md/3
sudo mdadm --stop /dev/md/3

sudo fdisk -l

cat /proc/mdstat 
sudo mdadm --assemble --scan

cat /proc/mdstat 
sudo mount /dev/md3 /mnt
cat /proc/mdstat 
sudo mount /dev/sdb1 /mnt

sudo fdisk -l

sudo mdadm stop /dev/md/0n3

cat /proc/mdstat
sudo mdadm --manage /dev/md0 --fail /dev/sda1
sudo mdadm --manage /dev/md0 --fail /dev/sda
sudo mdadm --manage /dev/md1 --fail /dev/sda2
sudo mdadm --manage /dev/md2 --fail /dev/sda3
cat /proc/mdstat
sudo sfdisk -d /dev/sda > sda.out
sudo sfdisk -d /dev/sdb |sudo sfdisk /dev/sda
sudo sfdisk -d /dev/sda > sda.out

sudo fdisk -l
sudo mdadm --manage /dev/md0 --add /dev/sda1
sudo mdadm --manage /dev/md1 --add /dev/sda2
sudo mdadm --manage /dev/md2 --add /dev/sda3
sudo mdadm --manage /dev/md3 --add /dev/sda5
cat /proc/mdstat 
watch cat /proc/mdstat 

Every 2.0s: cat /proc/mdstat                                                                                                                                                                 Mon Aug 17 13:15:31 2015

Personalities : [raid1]
md0 : active raid1 sda1[2] sdb1[1]
      4093888 blocks super 1.1 [2/2] [UU]

md1 : active raid1 sda2[2] sdb2[1]
      819136 blocks super 1.0 [2/2] [UU]

md3 : active raid1 sda5[2] sdb5[1]
      278538048 blocks super 1.1 [2/1] [_U]
      [==============>......]  recovery = 70.4% (196127360/278538048) finish=15.0min speed=91334K/sec
      bitmap: 0/3 pages [0KB], 65536KB chunk

md2 : active raid1 sda3[2] sdb3[1]
      204668800 blocks super 1.1 [2/2] [UU]
      bitmap: 0/2 pages [0KB], 65536KB chunk

unused devices: <none>

Good Luck


Unresponsive VMware Images

Over the past week I have had two vmware images become unresponsive.  When trying to access the images via the vmware console any action reports:

rejecting I/O to offline device

A reboot fixes the problem, however for a Linux guy that isn’t exactly acceptable.  Upon digging a little deeper it appears the problem is with disk latency or more specifically a disk communication loss or time out with the SAN.  I looked at the problem with the vmware admin and we did see a latency issue.  We reported that to the storage team.  That however does not fix my problem.  What to do…  The real problem is that systems do not like I/O temporary loss of communication with their disks.  This tends to result in a kernel panic or in this case never ending I/O errors.

Since this is really a problem of latency (or traffic) there are a couple of things that can be done on the Linux system to reduce the chances of this happening while the underlying problem is addressed.

There are two things you can address, swappiness (freeing memory by writing runtime memory to disk aka swap).  The default setting it 60 out of 100, this generates a lot of I/O.  Setting swappiness to 10 works well:

vi /etc/sysctl.conf
vm.swappiness = 10

Unfortunately for me, my systems already have this setting (but I verified it) so that isn’t my culprit.

The only other setting I could think of tweaking was the disk timeout threshold.  If you check your systems timeout it is probably set to the default of 30:

cat /sys/block/sda/device/timeout
30

Increasing this value to 180 will hopefully be sufficient to help me avoid problems in the future.  You do that by adding an entry to /etc/rc.local:

vi /etc/rc.local
echo 180 > /sys/block/sda/device/timeout

I’ll see how things go and report back if I experience any more problems with I/O.

 UPDATE (24 Sep 2015):

The above setting while good to have did not resolve he issue.  Fortunately I was logged into a system when it began having the I/O errors and I was still able to perform some admin functions.  Poking around the system and digging in the system logs dmesgs at the same time led me to this vmware knowledge base article about linux 2.6 systems and disk timeouts:

I passed this on to our vmware team.  They dug deeper and determined that installing vmware tools would accomplish the same thing.  I installed vmware tools on the server and the problem went away!  It seems vmware tools hides certain disk events that linux servers are susceptible to.  There you go, hope that helps.

To reboot or not to reboot?

You have patches to apply, we all know that if there are kernel patches that you need to (or at least should) restart/reboot the server.  But what about other packages?  There are a few non-kernel patches which can cause havoc if you spply them and do not reboot the server.  The biggest package that most people miss are libraries, specifically libraries used by the system, like glibc.  When the system is running it loads the libraries it needs into memory, updating does not force a reload of those libraries. Therefore after patching you will have the old version in memory and the new version on disk.  When a new subroutine or kernel process is called it will load the new version into memory, this is where the fun can start.  I say fun because you can see some really strange behavior.  Perhaps you have and in frustration rebooted, problem solved but you are perplexed, well now you know.

Since I deal mostly with Redhat these days here are the packages that require/highly recommend a reboot of the server.  (Caveat: If you can reload what is in memory you do not need to reboot.  This is what we do with services like tomcat or apache after a patch and that removes the old packages from memory and loads the new.)

While we all want to avoid interruptions to system uptime, when updating these packages a reboot is required.  Remember to use your own discretion as this list is provided as an informational guide only.  Redhat could introduce changes that increase or decrease this list.  You may be using packages not considered or functionality not examined.

Red Hat Enterprise Linux 5:

  • kernel
  • kernel-smp
  • kernel-PAE
  • kernel-xen
  • glibc
  • hal

Red Hat Enterprise Linux 6:

  • kernel
  • *-firmware-*
  • glibc
  • hal

Red Hat Enterprise Linux 7:

  • kernel
  • glibc
  • linux-firmware
  • systemd
  • udev

Remember if you don’t have to reboot you should restart the updated service.  Good Luck.

screen your work…

The Linux screen command is a very useful tool for many reasons. For one you don’t need to worry about losing your session.  Sometimes long running jobs with little or no output can lead to your remote session terminating, not usually a helpful thing.  Other benefits of the screen command are session logging (thing documentation) multitasking and session sharing.

The screen command is pretty darn easy to use but it does have some nice features that you may have to dig through the documentation to find.  I’ll give some highlights and add to this as I find new uses or useful features.  So let’s get started.

You can just issue the screen command ‘screen’ and you will immediately be in a screen session, not very useful.  Of course now that you are in a session how do you get out?! To exit but leave the screen session open/active type:

Ctrl-a d

To exit and terminate the screen session type:

Ctrl-a

Terminating the screen session will prompt you with the following, potentially misleading question:

Really quit and kill all your windows [y/n]

Choosing ‘y’ only kills the current session all other screen sessions that may be running are uneffected.

Once you leave a screen session you need to know how to re-enter it.  You need the screen session ID to do this, you can set one (covered shortly).  To list the active screen sessions issue this command:

# screen -ls
There are screens on:
13986.pts-0.hostname (Detached)
13488.pts-0.hostname (Detached)
16156.mylabel (Detached)

The last session listed was assigned a label (see below)  To reattach to a session you use the label or ID number like this:

screen -r 13986
OR
screen -r mylabel

Now that you have the basics I am going to speed things up and give a bunch of examples with explanations where necessary.  You can always refer to the screen man page.

From within a screen session using the command “Ctrl-A n“ will move you to the next screen session.  “Ctrl-A p“ will move you to the previous screen session.  “Ctrl-A c“ will create a new screen session.

The screen option -S  allows you to assign a Session Name/Label which makes multiple screen sessions easier to manage.  The screen option -L enables logging for the session.

screen -S "mylabel" -L

Cleaning up your Screen Log

The log screen produces contains a lot of special characters from typing mistakes, spaces, etc.  It can make the log difficult to read.  This command cleans out the majority of the cruft and make the file easier to read:

perl -ne 's/\x1b[[()=][;?0-9]*[0-9A-Za-z]?//g;s/\r//g;s/\007//g;print' < screen.0 > screen.0.readable

switch between these two tasks?

  • Switching between windows is the specialty of screen utility. So to switch between pine and wget window (or session) press CTRL+a followed by n key (first hit CTRL+a, releases both keys and press n).
  • To list all windows use the command CTRL+a followed by ” key (first hit CTRL+a, releases both keys and press ” ).
  • To switch to window by number use the command CTRL+a followed by ‘ (first hit CTRL+a, releases both keys and press ‘ it will prompt for window number).

press C-a d screen will detach from the screen session.

press C-a H screen will start recording everything to a file called screenlog.X (where X is a number starting at 0).

Using screen for shared command-line interaction:

  1. Set the screen binary (/usr/bin/screen) setuid root. By default, screen is installed with the setuid bit turned off, as this is a potential security hole.
  2. The first-user starts screen in a local xterm, for example via screen -S SessionName. The -S switch gives the session a name, which makes multiple screen sessions easier to manage.
  3. The second-user uses SSH to connect to the target system.
  4. The first-user then has to allow multiuser access in the screen session via the command Ctrl-a :multiuser on (all screen commands start with the screen escape sequence, Ctrl-a).
  5. Next the first-user grants permission to the second-user to access the screen session with Ctrl-a :acladd second-user where second-user is their login ID.
  6. The second-user can now connect to the first-user’s screen session. The syntax to connect to another user’s screen session is screen -x sessionID/name.

Common screen commands

screen command Task
Ctrl+a c Create new window
Ctrl+a k Kill the current window / session
Ctrl+a w List all windows
Ctrl+a 0-9 Go to a window numbered 0 9, use Ctrl+a w to see number
Ctrl+a Ctrl+a Toggle / switch between the current and previous window
Ctrl+a S Split terminal horizontally into regions and press Ctrl+a c to create new window there
Ctrl+a :resize Resize region
Ctrl+a :fit Fit screen size to new terminal size. You can also hit Ctrl+a F for the the same task
Ctrl+a :remove Remove / delete region. You can also hit Ctrl+a X for the same taks
Ctrl+a tab Move to next region
Ctrl+a D (Shift-d) Power detach and logout
Ctrl+a d Detach but keep shell window open
Ctrl-a Ctrl- Quit screen
Ctrl-a ? Display help screen i.e. display a list of commands

6GB free = 100% disk usage?!

What to do when you have plenty of available disk space but the system is telling you the disk is full?!  I was working on a server migration, moving 94GB of user files from the old server to the new server.  Since we aren’t planning on seeing a lot of growth on the new server, I provisioned a 100GB partition for the user files.  A perfect plan, right?…  So I thought.  After rsync’ing the user files, the new server was showing 100% disk usage:

Filesystem*            Size  Used Avail Use% Mounted on*
/dev/mapper/my_lv_name
                       99G   94G  105M 100% /user_dir

Given competing tasks, at first glance I only saw the 100%.  Naturally I assumed something went wrong with my rsync or I forgot to clear the target partition.  So I deleted everything from the target partition and rsyn’d again.  When the result was the same, it gave my brain pause to say…what?!

My first thought was that the block size was different for the two servers the old server block size was 4kB, perhaps the new server had a larger block size.  As we joked, to much air in the files!  Turns out, using the following commands, the block size was the same on both systems:

usage:
blockdev --getbsz partition
# blockdev --getbsz /dev/mapper/my_lv_name 
4096

So the block size of the file system on both servers is 4kB.

I started digging through the man pages of tune2fs and dumpe2fs (and google) to see if I could figure out what was consuming the disk space.  Perhaps there was a defunct process that was holding the blocks )like from a deletion), there wasn’t.  In my research I found the root cause.  New ext2/3/4 partitions set a 5% reserve for file system performance and to insure available space for “important” root processes.  Not a bad idea for the root and var partitions but this approach doesn’t make sense in most other use cases, in this case user data.

Using the tune2fs command we can see what the “Reserved block count” like this:

tune2fs -l /dev/mapper/vg_name-LogVol00

The specific lines we are interested in are:

Block count:              52165632
Reserved block count:     2608282

These lines show that there is a 5% reserve on the disk/Logical Volume.  We fix this with this command:

tune2fs -m 1 /dev/mapper/vg_name-LogVol00

This reduces the reserve to 1%.  The resulting Reserved block count reflects this 1%

Block count:              52165632
Reserved block count:     521107

While this situation is fairly unique, hopefully this will at the least answer your questions and help you better understand the systems you manage.

*The names in the above have been changed to protect the innocent.