RedHat 7

Network Interface Name in rhel7

Anyone who has installed rhel7 knows how annoying it is to check you network and not see eth0.  Perhaps it is just me then…  Regardless here are instructions on how to change it:

First you need to know the name of the network adapter in use, you can look in /etc/sysconfig/network-scripts/ifcfg-eno##### or run this command:

# ip addr show
Now you need to do the following:
vim /etc/sysconfig/grub
add “net.ifnames=0 biosdevname=0″ to the end of the line beginning with: GRUB_CMDLINE_LINUX, for example:
GRUB_CMDLINE_LINUX="crashkernel=auto rd.lvm.lv=rhel/root rd.lvm.lv=rhel/swap rhgb quiet net.ifnames=0 biosdevname=0"
Now you need to regenerate the GRUB configuration with the updated kernel parameters:
# grub2-mkconfig -o /boot/grub2/grub.cfg
Now you need to change the ‘eno##” named network scripts you identified above:
# cp -p /etc/sysconfig/network-scripts/ifcfg-eno16780032 /etc/sysconfig/network-scripts/ifcfg-eth0

Next edit the newly copied network script to change any reference to the eno### to eth0, for example:

sed -i -e 's/eno16780032/eth0/g' /etc/sysconfig/network-scripts/ifcfg-eth0

Now reboot:

# shutdown -r now

After system reboot your network interface shall be called eth0 and all will be right in the world again…

Hat tip to Angelo for most of the leg work.

Using redhat-support-tool in 10 space

OK, Private IP space, but you should know that 10 space means private IP space.

The command redhat-support-tool is useful when working with a Red Hat support ticket. Once a ticket is opened with Red Hat your next step should be to create and attach an sosreport to the ticket. If you don’t then you will waste valuable time as their first response will be, you guessed it, please attach an sosreport. Even attaching one is no guarantee they won’t still ask as they follow the script pretty closely.

The 90% use case for using the command redhat-support-tool is adding attachments, like this:

redhat-support-tool addattachment -c CASE_NUMBER /tmp/sosreport.tar.xz

If you have not configured /root/redhat-support-tool/redhat-support-tool.conf you will be prompted for your RHN user name and password.  Since I mentioned it please note that /root/redhat-support-tool contains your configuration file and a log file.  Please note: that if you configure global setting (more on that below) those settings are stored in /etc/redhat-support-tool.conf

Back to Private IP space use.  Supposedly you can configure this using the redhat-support-tool -> config option for example:

# redhat-support-tool
Command (? for help): config proxy_url proxy.your-url.domain

OR

# redhat-support-tool
Command (? for help): config proxy_url http://proxy.your-url.domain

OR setting it globally (sets it to /etc/redhat-support-tool.conf)

# redhat-support-tool
Command (? for help): config -g proxy_url http://proxy.your-url.domain

This however doesn’t always work, here is why with an explanation, thanks to my colleague Doug B:

I figured out the redhat-support-tool issue.

– It’s always connecting to proxy via https, so you have to use “http://proxy.url.edu:80” in order to force it.
– It may conflict with an http_proxy environment variable.

Even unsetting the variable within the tool (with –unset proxy_url) didn’t seem to clear out an incorrect entry – even though nothing was in the config file!

In the end it’s easiest to just to export http_proxy=http://proxy.url.edu:80 and not modify anything within the support tool itself.

As you can see a frustrating problem, yes we could have just transferred the file and uploaded it using the webUI or from another system but what would we have learned from that?!

Again, thanks to Doug B. for working with me on this.

Here is a link (account required) to more details about the redhat-support-tool: https://access.redhat.com/articles/445443


Kerberizing RHEL Server

Notes from Plone…

yum install krb5-workstation pam_krb5 -y
# if krb5.conf is present we should get a fresh copy
mv /etc/krb5.conf /etc/krb5.conf.bak
yum reinstall krb5-libs -y
sed -ie 's/example.com/uconn.edu/g' /etc/krb5.conf
sed -ie 's/EXAMPLE.COM/UCONN.EDU/g' /etc/krb5.conf
fqdn=`hostname --fqdn`;
echo "
ank -randkey host/$fqdn@UCONN.EDU
ktadd -k /etc/krb5.keytab host/$fqdn@UCONN.EDU
";

--- OR ---

kadmin netid/admin@UCONN.EDU
addprinc -randkey host/$fqdn
ktadd -k /etc/krb5.keytab host/$fqdn
modprinc -requires_preauth host/$fqdn
kadmin -p netid/admin@UCONN.EDU
exit
authconfig --enablekrb5 --updateall
echo "netid/admin@UCONN.EDU" >> ~/.k5login
restorecon ~/.k5login
chmod 600 .k5login
service sshd restart

systemd commands, hints and cheatsheet

List all running services

# systemctl

Start/stop or enable/disable services

Activates a service immediately:

# systemctl start foo.service

Deactivates a service immediately:

# systemctl stop foo.service

Restarts a service:

# systemctl restart foo.service

Shows status of a service including whether it is running or not:

# systemctl status foo.service

Enables a service to be started on bootup:

# systemctl enable foo.service

Disables a service to not start during bootup:

# systemctl disable foo.service

Check whether a service is already enabled or not:

# systemctl is-enabled foo.service; echo $?

0 indicates that it is enabled. 1 indicates that it is disabled

How do I change the runlevel?

systemd has the concept of targets which is a more flexible replacement for runlevels in sysvinit.

Run level 3 is emulated by multi-user.target. Run level 5 is emulated by graphical.target. runlevel3.target is a symbolic link to multi-user.target and runlevel5.target is a symbolic link to graphical.target.

You can switch to ‘runlevel 3′ by running

# systemctl isolate multi-user.target (or) systemctl isolate runlevel3.target

You can switch to ‘runlevel 5′ by running

# systemctl isolate graphical.target (or) systemctl isolate runlevel5.target

How do I change the default runlevel?

systemd uses symlinks to point to the default runlevel. You have to delete the existing symlink first before creating a new one

# rm /etc/systemd/system/default.target

Switch to runlevel 3 by default

# ln -sf /lib/systemd/system/multi-user.target /etc/systemd/system/default.target

Switch to runlevel 5 by default

# ln -sf /lib/systemd/system/graphical.target /etc/systemd/system/default.target

systemd does not use /etc/inittab file.

List the current run level

runlevel command still works with systemd. You can continue using that however runlevels is a legacy concept in systemd and is emulated via ‘targets’ and multiple targets can be active at the same time. So the equivalent in systemd terms is

# systemctl list-units --type=target

Powering off the machine

You can use

# poweroff

Some more possibilities are: halt -p, init 0, shutdown -P now

Note that halt used to work the same as poweroff in previous Fedora releases, but systemd distinguishes between the two, so halt without parameters now does exactly what it says – it merely stops the system without turning it off.


Service vs. systemd

# service NetworkManager stop

(or)

# systemctl stop NetworkManager.service

Chkconfig vs. systemd

# chkconfig NetworkManager off

(or)

# systemctl disable NetworkManager.service

Readahead

systemd has a built-in readahead implementation is not enabled on upgrades. It should improve bootup speed but your mileage may vary depending on your hardware. To enable readahead:

# systemctl enable systemd-readahead-collect.service
# systemctl enable systemd-readahead-replay.service

SystemD cheatsheet

service foobar start systemctl start foobar.service Used to start a service (not reboot persistent)
service foobar stop systemctl stop foobar.service Used to stop a service (not reboot persistent)
service foobar restart systemctl restart foobar.service Used to stop and then start a service
service foobar reload systemctl reload foobar.service When supported, reloads the config file without interrupting pending operations.
service foobar condrestart systemctl condrestart foobar.service Restarts if the service is already running.
service foobar status systemctl status foobar.service Tells whether a service is currently running.
ls /etc/rc.d/init.d/ ls /lib/systemd/system/*.service /etc/systemd/system/*.service Used to list the services that can be started or stopped
chkconfig foobar on systemctl enable foobar.service Turn the service on, for start at next boot, or other trigger.
chkconfig foobar off systemctl disable foobar.service Turn the service off for the next reboot, or any other trigger.
chkconfig foobar systemctl is-enabled foobar.service Used to check whether a service is configured to start or not in the current environment.
chkconfig foobar –list ls /etc/systemd/system/*.wants/foobar.service Used to list what levels this service is configured on or off
chkconfig foobar –add Not needed, no equivalent.

References

fedoraproject.org/wiki/Systemd
Linux readahead: less tricks for more
fedoraproject.org/wiki/SysVinit_to_Systemd_Cheatsheet
Password Recovery in Redhat 7

Forgot your password on your rhel7 server? Well there are some differences to process from rhel6. Here is how you do it.

With SELinux and systemd in the mix we have to deal with that. Here is the procedure of what needs to be done in order to recover a forgotten root password on Redhat 7 Linux:

Edit the GRUB2 boot menu and enter user single mode
Remount / partition to allow read and write
Reset the actual root password
Set entire system for SElinux relabeling after first reboot
Reboot the system from single mode

Now that we understand the procedure we can proceed with Redhat 7 password recovery.

1. Edit GRUB2 boot menu

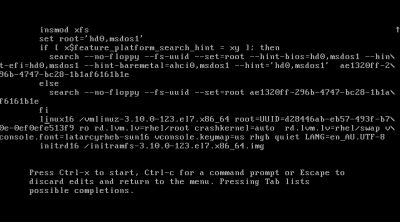
Start your system and once you see your GRUB2 boot menu use ‘e’ key to edit your default boot item. Usually it is the first line. Once you hit the ‘e’ key, scroll down and locate a line with ‘rhgb quiet’ keywords:

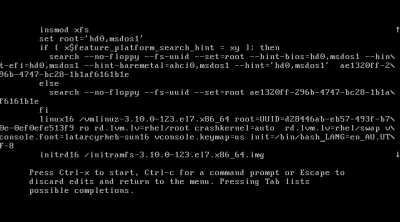
locate-line-grub2-boot-menu-rhel7-linuxMove to end of the line with CTRL+E then cursor to “rhgb quiet" keywords and replace them with “init=/bin/bash" as show below:

grub2-boot-menu-rhel7-linux-single-mode-reset-password

Once you edit the boot line as show above press “CTRL + x" to start booting your RHEL 7 system into a single mode. At the end of the system boot you will enter a single mode.


2. Read&Write root partition remount

Once you enter a single your root partition is mounted as Read Only ro. You ca confirm it with the following command:

# mount | grep root

In order to mount our partition with Read/Write flag we use mount with a remount option as follows:

# mount -o remount,rw /

Next, confirm that the root file system is mounted Read/Write rw:

# mount | grep root

3. Change root’s password

Still in the single mode we can proceed with the actual root password recovery. To do this we use passwd command:

# passwd

You will need to enter your password twice.

4. SELinux relabeling

The additional step which needs to be taken on SELinux enables Linux system is to relabel SELinux context. If this step is ommited you will not be able to login with your new root password. The following command will ensure that the SELinux context for entire system is relabeled after reboot:

# touch /.autorelabel

5. Reboot System

The final step when resetting your lost root password on RHEL 7 linux system is to reboot. This can be done with a following command:

# exec /sbin/init

After reboot you will be able to use your new root password.